12 Days of handmade Christmas gifts: DAY 12

My final idea (that I'm going to blog about :) is these cute little aprons I made for my two oldest daughters. I got the fabric in the remnant section. One thing I've learned from sewing is that the more you iron before hand the better the end result turns out.
Here's Apron #1 - very simple, just ties around the back.

I made it a bit more personal with my daughters initials on each of the aprons.

Style #2, a different, hopefully they wont fight over them that way.
And initials again :)
I wish all of you making handmade Christmas gifts much success! May this be a Christmas to remember for a long time!


Cheers!
Sabrina


I'm Published!

Writing is not a strong suit of mine, but it is something I'm working on. And I'm beyond excitement!! My first article has been published! Whoop!!! Check it out, it's about marketing your website for free. Click here to see it.

Cheers!
Sabrina

12 Days of handmade Christmas gifts: DAY 11

Pre-teens are so hard to predict. So I've been thinking what can I make for those girls on my list that are around age 11? So here's what I came up with.
Start with a piece of felt... What can't you do with felt? I traced my hands and then cut them out. I then sewed my hands to the felt leaving the bottoms free. Almost like two little pockets, my thinking is to stash a few polishes in there or small files.
I then stitched the word "Polish" on the felt. Colors are a bit off in the pict.
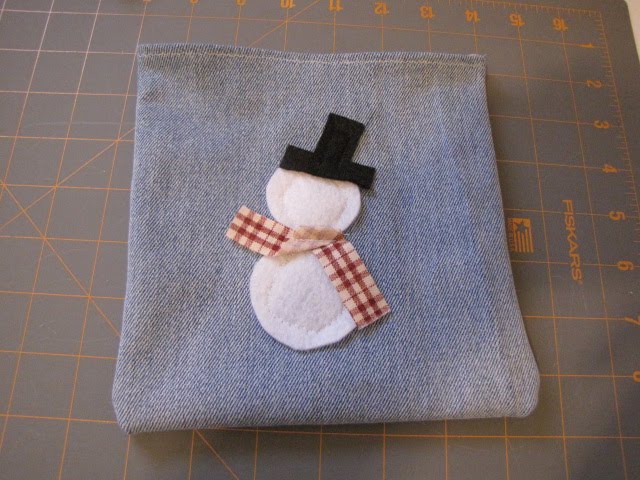
I then chose another piece of felt and sewed a long piece of ribbon to it. I would recommend finding the middle point and sewing 3 inches to the felt allowing the remainder of the ribbon to be lose.
Then attached your two pieces of felt together. I used a zig-zag stitch. As you see this is a perfect place to paint your finger nails, store your favorite polish and avoid a mess.
And when your done your able to roll up your polish pad and put it away for safe keeping. Cute right :)

12 Days of handmade Christmas gifts: DAY 10

O how I'm behind! I can not believe Thanksgiving is 2 days away. That means Christmas Eve is just 1 month away - OMG. Here's my project for today, I started out with an old pair of pants. I cut them to size. Then out of felt I cut out a little snowman, his hat, and scarf. I then sewed my snowman to the pants.
I then sewed my pants together leaving an opening at the top.
I then added the seam of the pants to the top. What a cute little purse for the holidays. I know a few little girls who will love it. I even thought that this might make a cute hostess gift with some goodies inside.

Cheers!
Sabrina


My Baby is 1

My Baby is 1!
One year ago today our youngest daughter was born. What a blessing she has been through the past year. It amazes me how God has made each of us so different. All three of my girls have unique qualities about them. That not only make them but teach me.

12 Days of handmade Christmas gifts: DAY 9

I'm on day 9 of handmade Christmas gifts. This one is super simple... I started with some festive fabric, and I cut it into 12/12 squares.
I then ironed the pieces and edges. I've found when sewing it makes the project much simpler if you spend some time ironing.
I then ran a simple stitch all the way around the squares.
I beaded some wire and made hooks on the ends. (You can find pre-cut wire at any craft store).
And Ta-DA! Handmade fabric napkin sets. A great addition to any ones holiday table. I have a friend in mind that I'm going to give these two.

On a side note my youngest daughter will be turning 1 tomorrow! It amazes me how quick time fly's. My great grandmother once told me that time is like angels.. it fly's away :) We'll be having a little celebration tomorrow for the big 1 year old. God has blessed us with her.
Cheers!
Sabrina

12 Days of handmade Christmas gifts: DAY 8

Welcome to my addition of 12 days of handmade Christmas gifts. If your stopping by from
Cafe Mom, Welcome!!!! I'm so glad you took some time out to take a look at my blog. Today's project is super fun! I had an old frame that the glass had been broken
out of it. So I spray painted it black.
I then drilled two holes in the top of the frame.
I picked a piece of ribbon that I liked and fished it through the frame, tying it in a lose knot.
I then ran a bead of glue around the inside rim of the frame.
I cut a piece of cork (You can find this at most any hardware store) and attached it to the inside of my frame.
Here's a quick view of what it will look like. The white glue will dry clear. This project along with some matching tacks would be such a cute addition to any ones home.
Cheers!
Sabrina


Package in the mail...

My husbands Granny is an amazing artist. I just received a package yesterday and this
painting was inside. The photo below is one that I took about a year ago of my
husband and our two daughters. Isn't it beautiful!
I have the portrait hanging in my entry way now. Thank You Granny!


12 Days of handmade Christmas gifts: DAY 7

There is this AMAZING Tut over at Playing Sublimely about Monogrammed Candles. I LOVED the idea. SO I gave it a try. I found that I don't have the steadiest hand. But they look OK. These candles I made for my Sister and Sister-in-laws.
I couldn't find the Glass and Tile Medium so this product was suggested to me. It comes in a spray can form and worked pretty well.


12 Days of handmade Christmas gifts: DAY 6

I'm back to my handmade food project for my kids. Today I made these cute little Tea bags. Started with some white felt, I cut to size.
I hand stitched the words "TEA" on to them.
Sewed on a piece of ribbon and cut the top to my liking.
Sewed them together with a zigzag design and added a piece of pink felt at the top.
And here you go! The cutest little play tea bags :)

12 Days of handmade Christmas gifts: DAY 5

Wow Christmas is just 47 days away! AHHH so close :) If you've stopped by from the Follow Me Back Tuesday hosted by http://www.littleyayas.com , WELCOME! I'm so glad you stopped by! Today's project was very easy to do. It would make a great Teachers gift. It's a mug holder. So I started with some fabric and sewed some padding in the inside.

I sewed the padding to the inside of the back piece of fabric.
I did a bit of needle point to create the word "Faith". But wouldn't this be cute with the word "Teacher" as a teachers gift?! I then sewed the Faith piece onto
the front of my front piece of fabric.
I sewed my pieces of fabric together front side to font side and then turned right side out to hide the seams. Then I attached a bit of Velcro.
And here you have it! Cute as can be. I'm thinking for one of our families gift exchanges I might include this along with at $5.00 gift certificate to Starbucks.


12 Days of handmade Christmas gifts: DAY 4 DIY Baby Blocks


Yesterday I worked on a project for my niece, nephew and God son.
It was super fun and really pretty easy. I started out with 6 square blocks of fabric.
I then attached ribbon and sewed the blocks together.

I then stuffed the squares and put a little bell inside so they jingle.
I made a total of 6 blocks, all different in color and size. I think there super cute.
And they are baby tested by my youngest... Perfect for baby hands :)

Friday Blog Hop

I'm joining in the fun with a Friday blog hop hosted by:
And if you've stopped by my blog I would like to THANK YOU and stay awhile!
Have a blessed day!
Sabrina

12 Days of handmade Christmas gifts: DAY 3

I love the way these cute little applique shirts look. So I thought I would give it a shot, not the worst but I've learned from it as well.
This would be a great idea for a baby gift or for the holiday season. First I laid out several different ribbon's that I had on hand.
Then I sewed them to the one-z.

Topped off the top with a button.
There you have it, my first attempt at decorating a little girls Christmas shirt :)


LinkWithin

Related Posts Plugin for WordPress, Blogger... Follow on Bloglovin