Rocking Horse

 This rocking horse was my little sisters when she was a kid. Some how it wound its way to my grandmas and then back to my house. 

It's seen lots of love and rides. It was scuffed up, warn, missing a wood bar across the bottom, eyes, most of its mane and all of its tail. 

So I decided to bring it back to life!

 I used some of my favorite grey paint and distressed it.
 I then made a mane and tail for it and now it's alive again!
 Perfect size for this cute little 3 year old!
Pin It

The best PURE Essential Oils for Sleep

Right at a year ago the Nation Sleep Foundation released a new recommendation for how many hours individuals should sleep. We must have sleep in order to function well, think clearly, have a healthy weight and be our best selves.

  • Newborns (0-3 months): Sleep range narrowed to 14-17 hours each day (previously it was 12-18)
  • Infants (4-11 months): Sleep range widened two hours to 12-15 hours (previously it was 14-15)
  • Toddlers (1-2 years): Sleep range widened by one hour to 11-14 hours (previously it was 12-14)
  • Preschoolers (3-5): Sleep range widened by one hour to 10-13 hours (previously it was 11-13)
  • School age children (6-13): Sleep range widened by one hour to 9-11 hours (previously it was 10-11)
  • Teenagers (14-17): Sleep range widened by one hour to 8-10 hours (previously it was 8.5-9.5)
  • Younger adults (18-25): Sleep range is 7-9 hours (new age category)
  • Adults (26-64): Sleep range did not change and remains 7-9 hours
  • Older adults (65+): Sleep range is 7-8 hours (new age category)
It was also stated that having oils, candles, or sachets in your room could be a calming part of your bedtime
routine and increase the quality of sleep you have each night. 

As your searching for Essential Oils remember that not all oils are created equally. Before you purchase any oils I recommend reading these two articles:
The Essential Oil Industry - What You Need to Know
Essential Oils and the "Therapeutic Grade" Myth

The top 7 Essential Oils for Sleep

Lavender


Usage

  • Wonderfully calming and versatile
  • Add a few drops to warm bath or to your pillow at night
  • Can help condition skin and be used as a skin fragrance
  • Massage on temples, scalp and forehead
  • Diffuse for a light, but luxurious aromatic experience


Eucalyptus


Usage

  • Dilute with PURE Coconut or Sweet Almond Oil before use
  • Diffuse or add 5-7 drops to your preferred humidifier
  • Add to the laundry for purifying and freshness
  • Rub 2 drops in your palms and smell for a stimulating and clarifying experience


Cedarwood

Usage

  • Grounding and relaxing aroma is perfect for meditation, balance and clarity
  • Warm and woodsy scent is perfect for calming massage therapy
  • Dilute and apply to the scalp
  • Known for its natural moth repellent effects


Ylang Ylang

Usage

  • Helps provide emotional balance and releases tension
  • Helps promotes healthy-looking skin and hair
  • Massage into neck, shoulders and tired feet
  • Rub 1-2 drops in palms and inhale deeply


Bergamot


Usage

  • Dilute with PURE Coconut or Sweet Almond Oil before use as needed
  • Diffuse to help unwind, uplift and promote relaxation
  • Can help soothe troubled skin
  • Known as a natural deodorizer


 Marjoram

Usage

  • Massage on the temples, neck and shoulders
  • Diffuse or place in a humidifier for a warm, comforting environment
  • Can be used in a warm bath


 Sandalwood

Usage

  • Balancing and grounding to help promote calmness and relaxation
  • Can be used in a skin and beauty regimen
  • Diffuse or add a few drops to a warm bath


Pin It

{PLANNING} for our 2nd Bathroom

Happy Friday! 
It's always fun to get to the end of a work week. As we are looking to this weekend I have something in particular on my mind. Our 2nd Bathroom!!!!!! 

We've lived in our home for 6 years and slowly we have been recreating the upstairs and finishing the basement. 

During the past 12 years we have added 4 kids to the mix of our lives and it's come to the point that a second bathroom is on our "MUST DO" list. Our 3 girls are getting bigger and are to the point of monopolizing our one bathroom on the main floor. 

The fun part for me is I can start planning and deciding what I want that bathroom to look like. I have a very specific idea in mind of what I want the finished product to look like. But a few unknowns are still there. 

Bathroom Floor:
It is a basement after all. So there are concrete floors. I'm leaning towards staining the floors. I'm not in love with this color though. Thoughts?!
 I also love the look of this ceramic wood tile. I think it would be beautiful on the floor.
 Vanity:
I'm feeling very confident in the area of a double vanity. Our girls are 10, 8 and 6 and I know that the extra counter space would be welcomed as they get older. We do have the square footage to do this too so that makes it more obtainable. 
 I love the raised sinks! But I am more in love with the old dresser turned into vanity (Now to find one that fits my ideas).
Lighting:
These lights are just the best! Rustic, but are they TOO rustic?!


 Shower:
This subway tile is so yummy! I love the timeless appeal of it with the dark grout.  
(I know for sure I want a stand up shower downstairs).

 But on the other hand a shower insert like this is clean, less upkeep but not sure if it's the ideal look I want.
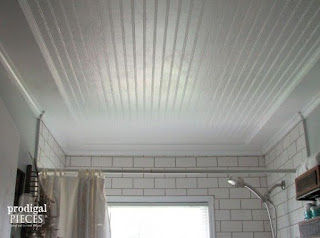
 Ceiling:
This bead board ceiling and beautiful trim is exactly what I'm thinking. It has the charm of an old home and a cozy feel. 
 The fun part of this weekend is we're starting the framing process. Far from finished but the wheels are spinning. Have a great weekend my friends!
Pin It

Simple Farmers Market Stencil

 I recently shared a coffee table that I made new again. Part of that creation was this fun stenciled top that I added to it. 
I wanted something unique that would fit in with our farming/ranching community. 

My first step was to pain the piece with Annie Sloan Chalk Paint for a clean fresh canvas. 

I was done in 5 steps:


Step 1: Create a Stencil. I cut my design out on card stock.
Step 2: Trace it out in Pencil.  I traced in pencil to avoid mistakes.
 Step 3: Trace over the pencil lettering with a sharpie. This helped to avoid any ragged edges as well as bleeding from the pencil as I was painting.
 Step 4: Paint. I painted my design with black chalk paint.
 Step 5: Sand. I wanted my table top to look like it truly came from a Farmers Market with an old feel but new paint.
 Once I was done I finished the project by using Annie Sloan wax and then going over it with dark wax.
 After both sets of wax we're cured I sanded the top with a low grit paper to truly make the piece unique with lots of imperfections to show the grain of the paint that I had added when painting the piece.

 Thanks for stopping by! Make it a great week.
Pin It

Transformation Tuesday: Coffee Table

 Happy Tuesday Friends! 
Last week I started bring life back to this coffee table. I picked it up from a friend who was moving this past fall and have had it in the garage since. 

As I started I gave it a huge cleaning with a gentle all purpose cleaner that I use on all of my projects to get the dirt and grime off of it. 

I debated often about what I wanted it to look like when finished. I used Annie Sloan Cocoa on the entire piece. Then stenciled the top with a stencil that I made using my Silhouette. Clear wax on the entire piece when done and the top was finished with dark wax and a new technique that I had never done. 

Take a look at all of my steps below...
 This table had corner protectors on it. And they we're stuck on! It took some prying and some sanding to get the protectors and all of that glue off.


I love how the table turned out. It has the cutest little drawer for remotes or things that you want to keep hidden away.
 I added a basket below to store some of our favorite magazines.

 I wanted this piece to have a perfect blend of old and new. With the feel of a warn sign on the top...


 ... and new, fresh, clean paint and hardware.


 May you have a great week friends!
Pin It

The Power of a 3 Ring Binder

 ORGANIZATION!!!!!!!!!!
It's one of those things that can be so under used. The power of Organization. Organizing your life, family, tasks, groups and all things YOU. 
Last year I set out a goal to be more organized because I would lose my keys every time I turned around, my desk was ALWAYS a mess and I needed to have some mental peace. 
I've taken it a step further this year, organizing all of my papers! 

This is step 1 in organizing all of your paper non sense.... 3 RING BINDERS!!!
 You can pick up 3 Ring Binders literally anywhere. Make sure you grab the ones with the plastic clear front covers. You'll want them for sure and here's why... Labeling!
I purchased several new binders to help organize each category of my life. I then did a Pinterest search for some printable binder covers. I found these super cute chevron one's HERE.   

 When you download the binder covers that you want they will be blank. You can edit them on www.picmonkey.com with the labels that fit your needs best. 

Here are my Examples:

 Print those babies off and put them on your binders. 
4 Way's to Use 3 Ring Binders:
  1.  Keep them in one location together that is designated for your binders. This helps to avoid the endless hours of searching for the materials you need.
  2. Be specific on what information you'll have in each binder.
  3. Use tabs inside the binder for all of the information you have included.
  4. When working on a project keep it with your binder. This allows for quick clean up if you need to move away from that item of business and helps you know where you we're when you come back to it.

Pin It
Take a minute to Educate Yourself 
 
 NOT ACHIEVING YOUR WEIGHT-LOSS GOAL can be a pretty frustrating experience – you might be tempted to buy some ice cream and turn your back on the gym.

But, regardless of what number you see on the scale, there are plenty of reasons to keep pursuing your fitness goals.

Read more HERE. 

LinkWithin

Related Posts Plugin for WordPress, Blogger... Follow on Bloglovin